
Picture this: you slide a golden, caramelized masterpiece from your oven, the buttery pastry crackling softly as it cools. The deep amber caramel glistens beneath perfectly tender apples, their edges kissed with that signature burnt-sugar sweetness. This is what happens when you master the art of tarte tatin recipe – France’s most beloved upside-down apple tart.
I’m Bella, and after years of perfecting this classic French dessert, I can promise you this: whether you’re a nervous beginner or a seasoned baker, this guide will give you the confidence to create a stunning Tarte Tatin every single time. No more soggy bottoms, crystallized caramel, or lopsided flips – just pure, caramelized perfection.
Why This is the Ultimate Foolproof Recipe
Here’s what makes this Easy Tarte Tatin guide different from everything else you’ll find:
• Two Recipes in One: Choose your own adventure with detailed instructions for both quick store-bought puff pastry and classic homemade pâte brisée. Whatever your skill level or time constraints, I’ve got you covered.
• No More Guesswork: I explain the science behind each step, so you understand exactly why we do what we do. Knowledge is power, especially when it comes to caramel!
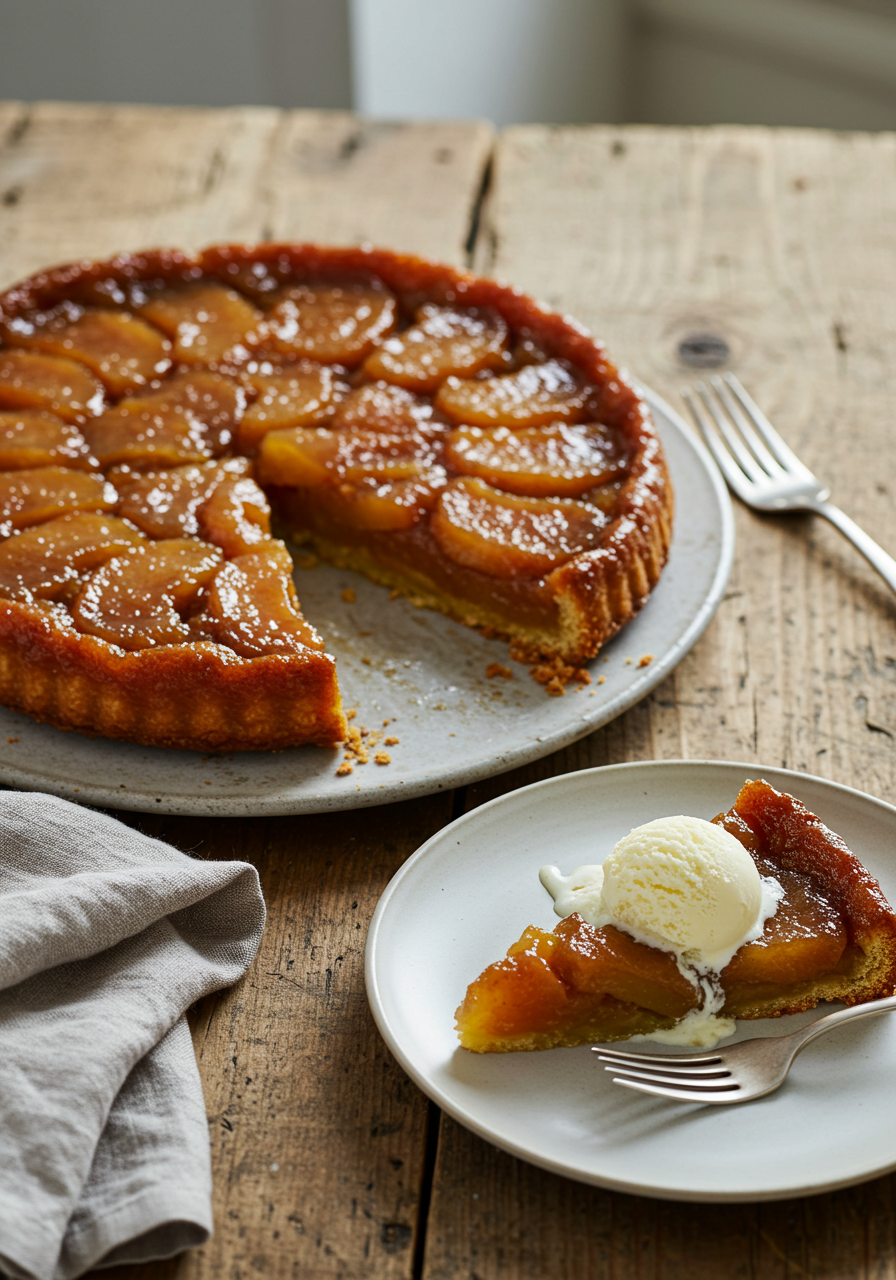
• Picture Perfect Results: Step-by-step photos guide you from raw ingredients to that gorgeous final flip, guaranteeing a beautiful presentation every time.
• Tested to Perfection: This recipe has been tested with multiple pan types (cast iron, stainless steel, even enameled) and various apple varieties to ensure it works in your kitchen, not just mine.
The Key Ingredients for Success

Let’s talk about what goes into this magical transformation. Each ingredient plays a crucial role, and understanding why will make you a better baker.
Apples: This is where many recipes go wrong. You need firm, tart apples that won’t turn to mush during the long cooking process. Granny Smith apples are my go-to choice – their tartness balances the sweet caramel beautifully, and they hold their shape like champions. Honeycrisp apples work wonderfully too, offering a bit more sweetness while maintaining that essential firmness. Plan on 6-8 medium apples depending on your pan size.

Sugar: Good old granulated sugar is the star of our caramel show. It melts into liquid gold, creating that signature bitter-sweet flavor that makes Tarte Tatin so irresistible.
Butter: Use unsalted butter – this gives you complete control over the salt content and prevents the caramel from becoming too salty. The butter adds richness and helps create that glossy, smooth caramel.
For the Easiest Tarte Tatin: All-Butter Puff Pastry
Store-bought puff pastry is your shortcut to success. Look for brands made with real butter (not vegetable shortening) for the best flavor and flakiness.
For a Classic French Tarte: Homemade Pâte Brisée
Traditional French pâte brisée is a simple butter pastry that’s less fussy than puff pastry but equally delicious. It’s basically pie crust, but the French way – minimal handling for maximum tenderness.
A Touch of Acidity: A splash of lemon juice or apple cider vinegar isn’t just for flavor – it helps prevent the caramel from crystallizing and adds a bright note that cuts through all that richness.
The Essential Equipment

Your pan choice can make or break your Tarte Tatin success. Here’s what works best:
Cast Iron Skillet: This is the gold standard. A well-seasoned 9 or 10-inch cast iron skillet holds heat beautifully, creating even caramelization. It goes from stovetop to oven seamlessly and gives you gorgeous browning.
Oven-Safe Stainless Steel Pan: If you don’t have cast iron, a heavy-bottomed stainless steel pan with oven-safe handles works wonderfully. Just make sure it’s not non-stick – you need that surface to help build proper caramel.
What About Non-Stick? I don’t recommend it. Non-stick surfaces prevent proper caramelization and can be damaged by the high heat needed for perfect caramel.
How to Make Tarte Tatin: A Step-by-Step Guide
Ready to create magic? Let’s walk through this together, step by delicious step.
Step 1: Prepare Your Pastry

If you’re making homemade pâte brisée, do this first and chill it while you prep the apples. For store-bought puff pastry, remove it from the freezer about 20 minutes before you need it – you want it pliable but still cold.
Cut your pastry into a circle about 2 inches larger than your pan diameter. This extra pastry will tuck down around the apples, creating a perfect seal.
Step 2: Peel and Arrange the Apples

Peel your apples and cut them in half from top to bottom. Remove the cores with a melon baller or knife, creating a nice hollow for the caramel to nestle into.
Here’s the key: arrange the apple halves cut-side up in your pan, packing them as tightly as possible. They’ll shrink as they cook, so what looks crowded now will be perfect later. Start from the outside and work your way in, creating a beautiful spiral pattern.

Step 3: Create the Perfect Caramel

This is where the magic happens. Sprinkle your sugar evenly over the apples, then dot with pieces of butter. Place the pan over medium-high heat and watch as the butter melts and the sugar begins to dissolve.
Don’t stir! Let the sugar melt naturally, swirling the pan occasionally if needed. You’re looking for a deep amber color – think “copper penny” rather than “pale gold.” This might take 10-15 minutes, so be patient.
Step 4: Cook the Apples in the Caramel

Once your caramel reaches that perfect amber shade, reduce the heat to medium and let the apples cook for about 15-20 minutes. They’ll release their juices, which will bubble up through the caramel – this is exactly what you want! The apples should be tender but still holding their shape.
Step 5: Top with Pastry and Bake

Remove the pan from heat and carefully lay your pastry over the apples. Tuck the edges down into the pan, creating a seal around the fruit. Cut a few small vents in the top to let steam escape.

Into a 425°F (220°C) oven it goes! Bake for 25-30 minutes until the pastry is golden brown and you can hear vigorous bubbling from inside.
Step 6: The Grand Finale – The Flip!

This is the moment of truth, but don’t panic – I’ve got you covered. Let the tart cool for exactly 5 minutes. Not longer (the caramel will harden) and not shorter (everything will be molten lava hot).
Run a knife around the edges to loosen any stuck bits. Place your serving platter upside down over the pan, take a deep breath, and flip quickly and confidently. Let gravity do the work, then lift the pan slowly. Voilà!

Pro Tips from a Pastry Chef
Don’t Fear the Caramel: A dark, amber caramel might look intimidating, but it’s actually your friend. Light caramel tastes sweet but boring – dark caramel has complex, slightly bitter notes that make this dessert sing.
Pack the Apples Tightly: I can’t stress this enough. Those apples will cook down significantly, and loose packing leads to gaps in your final tart.
Listen for the Bubbles: When your tart is in the oven, you should hear active bubbling. This tells you the caramel is working its magic underneath that pastry.
Making it Ahead: You can assemble the entire tart (without baking) up to 4 hours in advance. Keep it at room temperature, then bake as directed. For longer storage, bake completely, cool, and reheat at 350°F for 10 minutes before serving.
Troubleshooting Common Tarte Tatin Problems
“My caramel is watery!” This usually happens when you don’t cook the initial caramel long enough, or your apples release too much moisture. Solution: Cook the caramel to a deeper amber before adding heat, and make sure to cook the apples long enough to evaporate excess liquid.
“My caramel crystallized!” Crystallization happens when you stir the melting sugar or when impurities (like butter added too early) interfere with the process. Start over – there’s no fixing crystallized caramel.
“My pastry is soggy!” Usually caused by a too-cool oven or letting the assembled tart sit too long before baking. Make sure your oven is properly preheated and bake immediately after assembly.
Tarte Tatin Variations

Once you’ve mastered the classic, try these delicious variations:
Pear Tarte Tatin: Use firm pears like Bosc or Anjou. The technique is identical, but pears cook a bit faster, so watch your timing.
Savory Tarte Tatin: Caramelized shallots or cherry tomatoes make an elegant appetizer using the same technique.
Spiced Tarte Tatin: Add a pinch of cinnamon or the seeds from a vanilla bean to your caramel for warming spice notes.
Frequently Asked Questions (FAQ)
What’s the difference between Tarte Tatin and apple pie? Tarte Tatin is baked upside down with the fruit on the bottom creating a caramelized top when flipped. Apple pie has fruit filling between two layers of pastry.
What are the best apples for Tarte Tatin? Firm, tart varieties like Granny Smith or Honeycrisp work best. Avoid soft apples like Red Delicious that will turn to mush.
Can I use a different type of pan? Stick with oven-safe cast iron or heavy stainless steel. The pan needs to handle high stovetop heat and oven temperatures.
Can Tarte Tatin be made ahead of time? Yes! Assemble up to 4 hours ahead, or bake completely and reheat gently before serving.
How do you serve Tarte Tatin? Traditionally with crème fraîche, but vanilla ice cream or lightly whipped cream are delicious too.

Why is it called Tarte Tatin? Legend says the Tatin sisters at their hotel in France accidentally dropped an apple tart and served it upside down – and it was so delicious, it became their signature dish!
Ready to create your own caramelized masterpiece? This how to make Tarte Tatin guide gives you everything you need for success. I’d love to hear how yours turns out – leave a comment below and let me know about your Tarte Tatin adventures!


