

There’s something utterly captivating about a vintage-inspired birthday cake—it whispers stories of timeless elegance, classic celebrations, and moments that deserve to be remembered. Today, I’m sharing with you a recipe that combines old-world charm with modern sophistication: a stunning Vintage Birthday Cake with Black Ribbon. This isn’t just any birthday cake; it’s a showstopper that transforms any celebration into an unforgettable occasion.
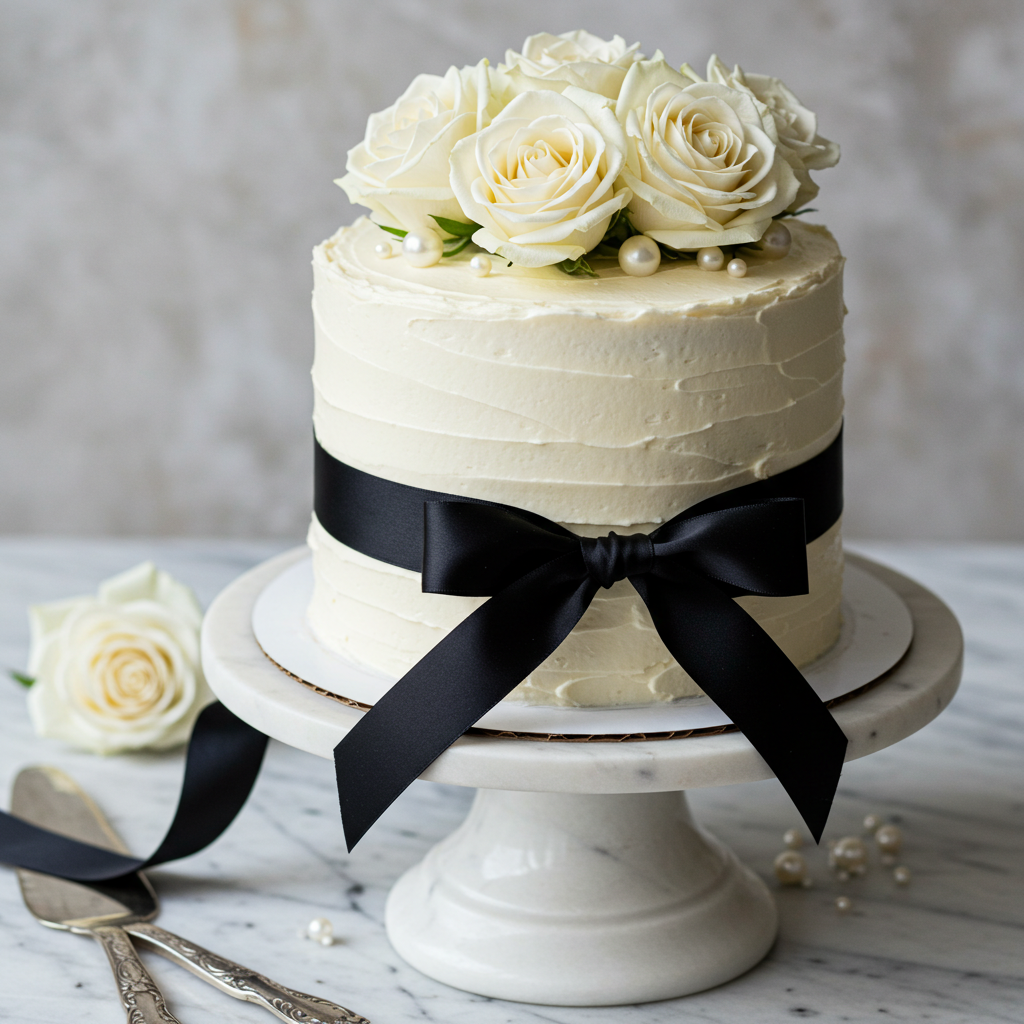
What makes this cake truly special? Imagine layers of tender, buttery vanilla cake with a delicate crumb that melts on your tongue, enrobed in silky Swiss meringue buttercream that’s as smooth as satin. The crowning glory? An elegant black ribbon that wraps around the cake like a designer accessory, giving it that sophisticated, vintage aesthetic that’s both dramatic and refined.
Whether you’re celebrating a milestone birthday, hosting a Gatsby-themed party, or simply want to create something extraordinary for someone special, this cake delivers on every level. The best part? While it looks like it came from an upscale bakery, you can absolutely create this masterpiece in your own kitchen. The techniques I’ll share with you are approachable, even if you’re not a professional baker, and the results are guaranteed to earn you rave reviews.
This recipe yields a moist, flavorful cake with a tight crumb that’s perfect for stacking and decorating. The neutral vanilla flavor serves as a perfect canvas, allowing you to customize with different fillings or flavors while maintaining that classic, timeless appeal. And let’s talk about that black ribbon—it adds instant drama and sophistication without requiring advanced cake decorating skills. It’s the little black dress of cake decorations!
Ingredients You’ll Need
For the Vanilla Cake Layers:
- 3 cups (375g) all-purpose flour, spooned and leveled
- 1 tablespoon baking powder
- ½ teaspoon salt
- 1 cup (226g) unsalted butter, softened to room temperature
- 2 cups (400g) granulated sugar
- 4 large eggs, room temperature
- 1 tablespoon pure vanilla extract (use the good stuff!)
- 1 cup (240ml) whole milk, room temperature
- ½ cup (120ml) sour cream, room temperature
For the Swiss Meringue Buttercream:
- 5 large egg whites
- 1¼ cups (250g) granulated sugar
- 1½ cups (339g) unsalted butter, softened and cut into tablespoons
- 1 teaspoon pure vanilla extract
- ⅛ teaspoon salt
- Gel food coloring (ivory or cream for the vintage look)
For the Simple Syrup:
- ½ cup (100g) granulated sugar
- ½ cup (120ml) water
- 1 teaspoon vanilla extract
For Decoration:
- 2-3 yards high-quality black grosgrain ribbon (1.5 to 2 inches wide)
- Fresh flowers (optional, for topping)
- Pearl or gold dragées (optional)
Step-by-Step Instructions
Preparing the Cake Layers
Step 1: Begin by preheating your oven to 350°F (175°C). Prepare three 8-inch round cake pans by greasing them generously with butter, lining the bottoms with parchment paper circles, then greasing and flouring the parchment and sides. This ensures your cakes release perfectly every time.
Step 2: In a medium bowl, whisk together the flour, baking powder, and salt. Set this dry mixture aside. This step is crucial—properly combining your dry ingredients ensures even distribution of leavening agents throughout your cake.
Step 3: Using a stand mixer fitted with the paddle attachment (or a hand mixer), cream the softened butter and sugar together on medium-high speed for about 4-5 minutes. You want the mixture to become light, fluffy, and pale in color. This process incorporates air into your batter, creating that tender crumb we’re after.
Step 4: Add the eggs one at a time, beating well after each addition. Make sure to scrape down the sides of the bowl between additions. Mix in the vanilla extract until fully incorporated.
Step 5: In a separate measuring cup or small bowl, whisk together the milk and sour cream. The sour cream adds richness and helps keep the cake incredibly moist for days.
Step 6: Now comes the important part: alternate adding your dry ingredients and wet ingredients to the butter mixture. Start and end with the dry ingredients, mixing on low speed. Add about one-third of the flour mixture, then half the milk mixture, another third of the flour, the remaining milk mixture, and finally the last of the flour. Mix only until just combined after each addition—overmixing develops gluten and can make your cake tough.
Step 7: Divide the batter evenly among your three prepared pans. I like to use a kitchen scale to ensure even layers, which helps with baking consistency. Each pan should have about 570-580 grams of batter.
Step 8: Bake for 25-30 minutes, or until a toothpick inserted into the center comes out with just a few moist crumbs. The tops should spring back when lightly pressed. Don’t overbake—you want these layers moist and tender.
Step 9: Let the cakes cool in their pans for 15 minutes, then turn them out onto wire racks to cool completely. This patience is essential; frosting warm cake will melt your buttercream.
Making the Swiss Meringue Buttercream
Step 10: While your cakes cool, prepare your buttercream. Combine the egg whites and sugar in a heat-proof bowl (your mixer bowl works great). Place the bowl over a saucepan of simmering water, making sure the bottom doesn’t touch the water.
Step 11: Whisk constantly until the sugar completely dissolves and the mixture reaches 160°F (71°C) on a candy thermometer. It should feel smooth between your fingers with no grittiness.
Step 12: Transfer the bowl to your stand mixer fitted with the whisk attachment. Beat on high speed for 8-10 minutes until you have glossy, stiff peaks and the bowl has cooled to room temperature.
Step 13: Switch to the paddle attachment and reduce speed to medium-low. Begin adding the butter one tablespoon at a time, allowing each piece to incorporate before adding the next. Don’t panic if the mixture looks curdled at first—keep mixing! It will come together into silky perfection.
Step 14: Once all the butter is incorporated, add the vanilla and salt. Beat for another 2-3 minutes until smooth and creamy. Add a tiny amount of ivory or cream gel food coloring for that vintage tone.
Preparing the Simple Syrup
Step 15: Combine sugar and water in a small saucepan over medium heat. Stir until the sugar dissolves completely, then remove from heat and stir in the vanilla extract. Let it cool to room temperature. This syrup keeps your cake layers incredibly moist.
Assembling Your Vintage Birthday Cake
Step 16: Level your cake layers using a serrated knife or cake leveler if needed. Place your first layer on a cake board or serving plate. Brush generously with simple syrup.
Step 17: Spread about ¾ cup of buttercream over the first layer, creating an even surface. Place the second cake layer on top, brush with syrup, and add another layer of buttercream.
Step 18: Add the final cake layer (place it bottom-side up for a perfectly flat top), and brush with the remaining simple syrup.
Step 19: Apply a thin “crumb coat” of buttercream over the entire cake. This seals in any loose crumbs. Refrigerate for 30 minutes until firm.
Step 20: Apply your final coat of buttercream, using an offset spatula or bench scraper to achieve smooth sides. For that vintage look, you don’t need perfection—a slightly rustic finish adds character. Chill the cake for another 30 minutes.
Step 21: Carefully wrap your black grosgrain ribbon around the cake, positioning it wherever you like—around the base, middle, or create multiple bands. Secure the ribbon with a small dot of buttercream where the ends meet at the back of the cake.
Step 22: Add your final decorative touches: fresh flowers on top, delicate pearl dragées, or keep it elegantly simple with just the ribbon.
Recipe Notes & Variations
Flavor Variations: While vanilla is classic, you can easily adapt this recipe. Try adding lemon zest and lemon extract for a citrus version, or fold in espresso powder for a mocha twist. Almond extract creates a beautiful wedding cake flavor profile.
Chocolate Version: Replace ¾ cup of flour with Dutch-process cocoa powder for chocolate cake layers. The black ribbon looks stunning against dark chocolate cake!
Filling Options: Between your cake layers, consider spreading raspberry preserves, lemon curd, or salted caramel sauce along with the buttercream for extra flavor dimension.
Buttercream Alternatives: If Swiss meringue buttercream feels intimidating, you can use American buttercream (butter, powdered sugar, cream, and vanilla) or cream cheese frosting instead, though Swiss meringue provides the smoothest finish.
Size Adjustments: This recipe easily scales. For a two-tier cake, double the recipe. For a smaller 6-inch cake, reduce ingredients by one-third and use 6-inch pans.
Make-Ahead Tips: Bake cake layers up to two days ahead; wrap tightly and refrigerate. Buttercream can be made three days in advance and stored in the refrigerator (bring to room temperature and re-whip before using).
Ribbon Color Options: While black creates that sophisticated vintage look, consider navy blue, burgundy, dusty rose, or ivory for different aesthetics. Always use food-safe ribbon or create a barrier between ribbon and cake.
Serving Suggestions
This vintage birthday cake is a statement piece that deserves a beautiful presentation. Serve it on a cake stand or elegant platter as your table centerpiece. Each slice reveals those beautiful, even layers—perfect for that Instagram-worthy moment!
Pair this cake with:
- Champagne or sparkling wine for adult celebrations
- Hot coffee or espresso to complement the sweet buttercream
- Fresh berries on the side for a pop of color and freshness
- Vanilla ice cream for an indulgent dessert experience
For serving at a party, I recommend slicing the cake into 12-16 generous pieces. Use a sharp knife dipped in hot water and wiped clean between cuts for the cleanest slices.
Consider the occasion when plating. For formal affairs, plate with a raspberry coulis drizzle and fresh mint. For casual celebrations, a simple dusting of edible gold dust adds sparkle without fuss.
Storage & Reheating Tips
Room Temperature: This cake keeps beautifully at room temperature for up to two days when stored in an airtight cake container. The buttercream actually protects the cake layers from drying out.
Refrigeration: For longer storage, refrigerate the cake for up to five days. Cover it loosely with plastic wrap or place it in a large cake box. Before serving, let it sit at room temperature for 30-45 minutes—buttercream tastes best when it’s not cold, and the cake texture improves as it warms slightly.
Freezing: You can freeze individual slices or the entire cake (before adding ribbon and fresh flowers) for up to three months. Wrap very well in plastic wrap, then aluminum foil. Thaw overnight in the refrigerator, then bring to room temperature before serving.
Pro Tip: If you notice the buttercream becoming too soft at room temperature (especially in warm weather), pop the cake in the refrigerator for 15-20 minutes to firm it up before serving.
Nutrition Information (Per Slice, Based on 16 Servings)
- Calories: 485
- Total Fat: 24g
- Saturated Fat: 15g
- Cholesterol: 115mg
- Sodium: 180mg
- Total Carbohydrates: 63g
- Dietary Fiber: 0.5g
- Sugars: 48g
- Protein: 5g
Note: Nutrition information is approximate and calculated without optional decorative elements. Values may vary based on specific ingredients and portion sizes.
Conclusion
There you have it—your complete guide to creating a stunning Vintage Birthday Cake with Black Ribbon that’s sure to be the star of any celebration! This recipe proves that with the right techniques and a little patience, you can create bakery-worthy masterpieces right in your own kitchen.
What I love most about this cake is how it combines approachable techniques with impressive results. Yes, it takes time, but every step is straightforward, and the payoff is absolutely worth it. The combination of tender, moist cake layers with silky buttercream creates a flavor and texture experience that store-bought cakes simply can’t match.
The vintage aesthetic with that elegant black ribbon makes this cake perfect for milestone birthdays, sophisticated celebrations, or any time you want to create something truly memorable. It’s a cake that photographs beautifully, tastes incredible, and shows the recipient just how much they mean to you.
I’d love to hear how your cake turns out! Did you add your own creative twist? What occasion are you celebrating? Share your photos and experiences—your success stories inspire me and help other bakers feel confident trying new recipes.
Now, tie on that apron, preheat that oven, and get ready to create some delicious memories. Happy baking! 🎂✨
Print
Vintage Birthday Cake with Black Ribbon
- Total Time: 3 hours 15 minutes (including cooling and assembly)
- Yield: 12–16 servings 1x
- Diet: Vegetarian
Description
An elegant vintage-inspired birthday cake featuring tender vanilla layers, silky Swiss meringue buttercream, and a sophisticated black ribbon decoration. This showstopping cake combines old-world charm with modern sophistication, perfect for milestone celebrations and special occasions.
Ingredients
Here’s all the information formatted for your recipe card:
CREATE RECIPE
Select Image: [Upload your vintage birthday cake image]
Title
Vintage Birthday Cake with Black Ribbon
Author Name
[Your Name/Blog Name]
Description
An elegant vintage-inspired birthday cake featuring tender vanilla layers, silky Swiss meringue buttercream, and a sophisticated black ribbon decoration. This showstopping cake combines old-world charm with modern sophistication, perfect for milestone celebrations and special occasions.
Ingredients
For the Vanilla Cake Layers:
- 3 cups (375g) all-purpose flour, spooned and leveled
- 1 tablespoon baking powder
- ½ teaspoon salt
- 1 cup (226g) unsalted butter, softened to room temperature
- 2 cups (400g) granulated sugar
- 4 large eggs, room temperature
- 1 tablespoon pure vanilla extract
- 1 cup (240ml) whole milk, room temperature
- ½ cup (120ml) sour cream, room temperature
For the Swiss Meringue Buttercream:
- 5 large egg whites
- 1¼ cups (250g) granulated sugar
- 1½ cups (339g) unsalted butter, softened and cut into tablespoons
- 1 teaspoon pure vanilla extract
- ⅛ teaspoon salt
- Gel food coloring (ivory or cream)
For the Simple Syrup:
- ½ cup (100g) granulated sugar
- ½ cup (120ml) water
- 1 teaspoon vanilla extract
For Decoration:
- 2–3 yards black grosgrain ribbon (1.5 to 2 inches wide)
- Fresh flowers (optional)
- Pearl or gold dragées (optional)
Instructions
- Preheat oven to 350°F (175°C). Grease three 8-inch round cake pans, line with parchment paper, then grease and flour.
- Whisk together flour, baking powder, and salt in a medium bowl. Set aside.
- Cream butter and sugar with mixer for 4-5 minutes until light and fluffy.
- Add eggs one at a time, beating well after each. Mix in vanilla extract.
- Whisk together milk and sour cream in a separate bowl.
- Alternate adding dry ingredients and milk mixture to butter mixture, beginning and ending with dry ingredients. Mix on low until just combined.
- Divide batter evenly among prepared pans (about 570-580g each).
- Bake 25-30 minutes until toothpick comes out with moist crumbs. Cool in pans 15 minutes, then turn out onto wire racks to cool completely.
- For buttercream: Combine egg whites and sugar in heat-proof bowl over simmering water. Whisk until mixture reaches 160°F and sugar dissolves.
- Transfer to mixer and beat on high 8-10 minutes until glossy peaks form and bowl cools.
- Switch to paddle attachment. Add butter one tablespoon at a time on medium-low speed.
- Add vanilla, salt, and food coloring. Beat 2-3 minutes until smooth.
- For simple syrup: Heat sugar and water until sugar dissolves. Remove from heat, add vanilla, and cool.
- Level cake layers if needed. Place first layer on cake board and brush with simple syrup.
- Spread ¾ cup buttercream on first layer. Add second layer, brush with syrup, add buttercream.
- Add final layer bottom-side up, brush with syrup.
- Apply thin crumb coat of buttercream. Refrigerate 30 minutes.
- Apply final coat of buttercream, smoothing with offset spatula. Chill 30 minutes.
- Wrap black ribbon around cake, securing with buttercream at back.
- Add fresh flowers, dragées, or other decorations as desired.
Notes
- All ingredients should be at room temperature for best results
- Don’t overmix the cake batter to ensure tender crumb
- Swiss meringue buttercream may look curdled while adding butter—keep mixing, it will come together
- Cake layers can be baked 2 days ahead; wrap tightly and refrigerate
- Buttercream can be made 3 days in advance; refrigerate and re-whip before using
- Use food-safe ribbon or create barrier between ribbon and cake
- For chocolate version: Replace ¾ cup flour with Dutch-process cocoa powder
- Alternative fillings: raspberry preserves, lemon curd, or salted caramel
- Prep Time: 45 minutes
- Cook Time: 30 minutes
- Category: Dessert, Cake
- Method: Baking
- Cuisine: American
Nutrition
- Serving Size: 1 slice (approximately 145g)
- Calories: 485 kcal
- Sugar: 48g
- Sodium: 180mg
- Fat: 24g
- Saturated Fat: 15g
- Unsaturated Fat: 8g
- Trans Fat: 0g
- Carbohydrates: 63g
- Fiber: 0.5g
- Protein: 5g
- Cholesterol: 115mg


